Using Java to check for proxy and VPN with IP2Location.io geolocation API
Java is a versatile language and by using the IP2Location.io SDK, it will become even more powerful.

Intro
Java is a versatile programming language and it can be extended by the large number of useful libraries found in the Maven repository. One of the useful libraries found in Maven is the IP2Location.io Java SDK that is a wrapper for the IP2Location.io API. This SDK takes the hassle out of parsing the raw JSON from the API and has deserialized it into a more usable object. IP2Location.io enables the developer to query the API with an IP address and will receive IP geolocation as well as proxy server info.
So why do we need proxy detection?
Proxy servers such as Virtual Private Network (VPN) and residential proxies, are commonly used to shield the identities of people when they are browsing on websites. Privacy-minded folks like to use VPN and residential proxies because their ISPs cannot read their network traffic due to encryption. No need to worry about ISPs spying on your habits.
That said, some people do use VPN to hide their trail when they are committing order fraud on e-commerce sites. Websites trying to screen orders for fraud, are unable to geolocate the actual buyer’s location. They can only see which country the VPN server is geolocated which can be misleading. That’s why it’s important that online merchants can get accurate proxy detection to flush out fraudsters.
Some fraudsters go even further and utilize the services of residential proxy servers. These servers act in a similar fashion to VPN servers. The big difference is that VPN servers are usually hosted within data centers while residential proxies are just plain old home computers. The owners of these home computers have a revenue sharing program with the proxy providers, in exchange for proxying their computers’ bandwidths. It’s hard to classify an IP address as a residential proxy as a real home user could be using that IP address. Good news is that IP2Location.io can detect with good certainty which IP address is a residential proxy, especially if the proxy server is under the major proxy providers.
To help protect websites from such proxies, we’ll take a look at how to call the IP2Location.io Java SDK in a Maven project.
Let’s dive right into the technical bits
First of all, we’ll be showing our demo via a Debian 12 machine so our steps will be specific to that platform. Also, please sign up for an IP2Location.io API key before we jump into the technical parts. You can sign up for the free plan to get started.
Installing the Java Runtime Environment (JRE) and Java Development Kit (JDK)
Run the below command to install the JRE and JDK.
sudo apt update
sudo apt install default-jre
sudo apt install default-jdk
Run the below command to check what version of JRE we have.
java -version
We get the below.

Installing Maven
Next, we’ll install Maven. Refer to https://maven.apache.org/download.cgi for the latest version and update the steps below.
Download Maven.
wget https://dlcdn.apache.org/maven/maven-3/3.9.5/binaries/apache-maven-3.9.5-bin.tar.gz
Extract to the /opt folder.
sudo tar xzvf apache-maven-3.9.5-bin.tar.gz -C /opt
Create a symbolic link to that folder.
sudo ln -s /opt/apache-maven-3.9.5 /opt/maven
Configure environment variables
Check the path for the java command.
sudo update-alternatives --config java
We see the below.

In our case, the path is /usr/lib/jvm/java-17-openjdk-amd64/bin/java but you may see multiple if your system has multiple versions installed. You can select the one that you wish to use.
Run the below command to specify our environment variables.
sudo nano /etc/profile.d/maven.sh
Paste the below into that file.
export JAVA_HOME=/usr/lib/jvm/java-17-openjdk-amd64
export M2_HOME=/opt/maven
export PATH=${M2_HOME}/bin:${PATH}
NOTE: The JAVA_HOME path should NOT include the bin folder part.

Save the changes to the maven.sh and run the below to reload the variables for the current session.
source /etc/profile.d/maven.sh
Check the mvn version to make sure the variables are working.
mvn -version

Create a new Maven project using a template
We will use a Maven template called maven-archetype-quickstart to create a skeleton project for us. First, create a folder called Maven_app and navigate into it.
mkdir Maven_app
cd Maven_app
Then, run the command below to generate our demo project that will be called IP2LocationIOExample with the group id com.example.ip2locationio.
mvn archetype:generate -DgroupId=com.example.ip2locationio -DartifactId=IP2LocationIOExample -DarchetypeArtifactId=maven-archetype-quickstart -DinteractiveMode=false
The created folder structure looks like the below.
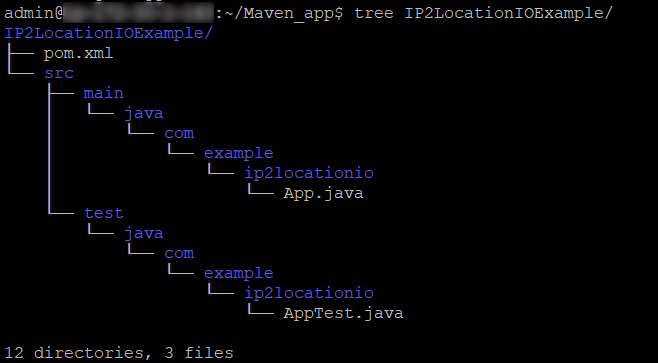
For the purpose of this article, we won’t be doing any test cases, hence we’ll ignore AppTest.java and just modify the pom.xml and App.java files.
Add IP2Location.io Java SDK into the Maven project
Check https://central.sonatype.com/artifact/com.ip2location/ip2location-io-java for the latest version available and update the steps below.
We’ll edit the pom.xml to add the IP2Location.io Java SDK as a dependency.
cd IP2LocationIOExample
nano pom.xml
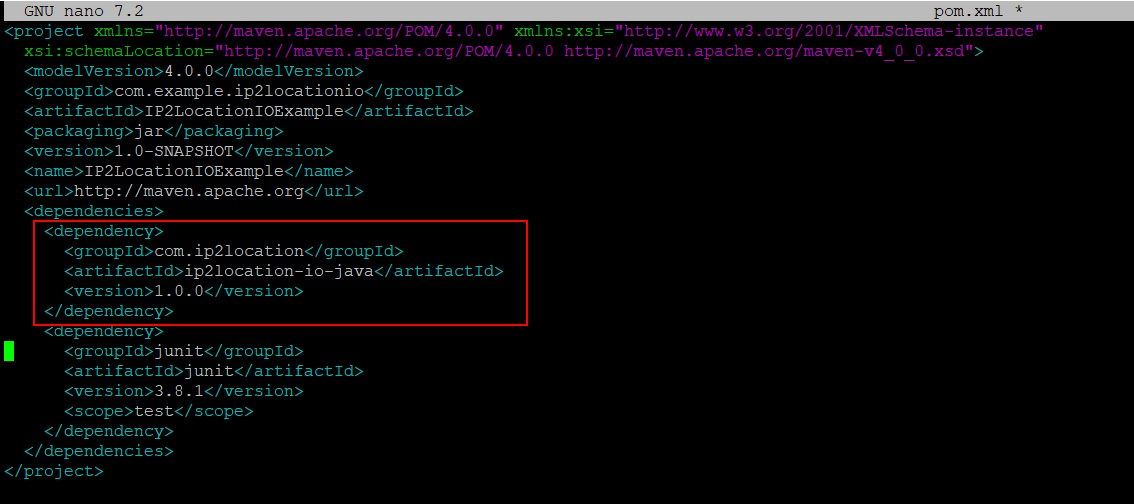
Add the below into the <dependencies> section using the latest version and save the changes.
<dependency>
<groupId>com.ip2location</groupId>
<artifactId>ip2location-io-java</artifactId>
<version>1.0.0</version>
</dependency>
Modify the App.java code to use our example code
Edit the App.java file.
nano src/main/java/com/example/ip2locationio/App.java
Paste the code below to replace the original code. Then edit the code to use your own IP2Location.io API key. Save the changes.
package com.example.ip2locationio;

import com.google.gson.JsonObject;
import com.ip2location.Configuration;
import com.ip2location.IPGeolocation;

public class App
{
    public static void main( String[] args ) throws Exception
    {
        // Configures IP2Location.io API key
        Configuration config = new Configuration();
        String apiKey = "YOUR_API_KEY";

        config.setApiKey(apiKey);
        IPGeolocation ipl = new IPGeolocation(config);

        // Lookup ip address geolocation data
        JsonObject myObj = ipl.Lookup("8.8.8.8", "en"); // the language parameter is only available for Plus and Security plans
        System.out.println(myObj);

        System.out.println("country_code: " + myObj.get("country_code").getAsString());
        System.out.println("region_name: " + myObj.get("region_name").getAsString());
        System.out.println("city_name: " + myObj.get("city_name").getAsString());
        JsonObject proxy = myObj.getAsJsonObject("proxy");
        if (proxy != null) {
                System.out.println("proxy => is_vpn: " + proxy.get("is_vpn").getAsBoolean());
                System.out.println("proxy => is_residential_proxy: " + proxy.get("is_residential_proxy").getAsBoolean());
        }
    }
}
Testing the code
To compile, run the below.
mvn clean package
To run the app, run the below.
mvn exec:java -Dexec.mainClass="com.example.ip2locationio.App" -Dexec.cleanupDaemonThreads=false
You should see the result like the below.
{"ip":"8.8.8.8","country_code":"US","country_name":"United States of America","region_name":"California","city_name":"Mountain View","latitude":37.38605,"longitude":-122.08385,"zip_code":"94035","time_zone":"-08:00","asn":"15169","as":"Google LLC","isp":"Google LLC","domain":"google.com","net_speed":"T1","idd_code":"1","area_code":"650","weather_station_code":"USCA0746","weather_station_name":"Mountain View","mcc":"-","mnc":"-","mobile_brand":"-","elevation":32,"usage_type":"DCH","address_type":"Anycast","continent":{"name":"North America","code":"NA","hemisphere":["north","west"],"translation":{"lang":"en","value":"North America"}},"district":"Santa Clara County","country":{"name":"United States of America","alpha3_code":"USA","numeric_code":840,"demonym":"Americans","flag":"https://cdn.ip2location.io/assets/img/flags/us.png","capital":"Washington, D.C.","total_area":9826675,"population":331002651,"currency":{"code":"USD","name":"United States Dollar","symbol":"$"},"language":{"code":"EN","name":"English"},"tld":"us","translation":{"lang":"en","value":"United States of America"}},"region":{"name":"California","code":"US-CA","translation":{"lang":"en","value":"California"}},"city":{"name":"Mountain View","translation":{"lang":"en","value":"Mountain View"}},"time_zone_info":{"olson":"America/Los_Angeles","current_time":"2023-11-22T22:42:02-08:00","gmt_offset":-28800,"is_dst":false,"sunrise":"06:56","sunset":"16:53"},"geotargeting":{"metro":"807"},"ads_category":"IAB19-11","ads_category_name":"Data Centers","is_proxy":false,"proxy":{"last_seen":22,"proxy_type":"DCH","threat":"-","provider":"-","is_vpn":false,"is_tor":false,"is_data_center":true,"is_public_proxy":false,"is_web_proxy":false,"is_web_crawler":false,"is_residential_proxy":false,"is_spammer":false,"is_scanner":false,"is_botnet":false}}
country_code: US
region_name: California
city_name: Mountain View
proxy => is_vpn: false
proxy => is_residential_proxy: false
In our code, we first print the whole result object which will show all the fields returned. Then we output some individual fields to see their values. The fields with “=>” are nested fields.
That’s basically how you call the IP2Location.io API to see the IP geolocation and proxy details. Online stores need to check the is_vpn and is_residential_proxy fields. If either one is true, then that online order should be rejected to prevent fraud.
Conclusion
There are a lot of fields returned by the API but that’s because we are using the highest available plan which is the Security plan. If you aren’t subscribed to the Security plan, you will encounter much less fields. However, even the free plan comes with useful basic geolocation data. It’s up to the developers to fully utilize what’s given to make their websites better.
